Sunday, February 17, 2019

KERALA PAL PAYASAM (MILK KHEER )

With this post, am starting a new series NALA PACHAKAM. I have many male friends who are very good at cooking. Hence I thought of  accommodating their contribution as well in my blog. This special payasam recipe is from my friend Madhu. He has shared a few tips as well for making the payasam more delicious. Since i was so keen to share traditional tips, with so much patience he had shared  the same. Thank you so much Madhu for sharing this wonderful recfipe.
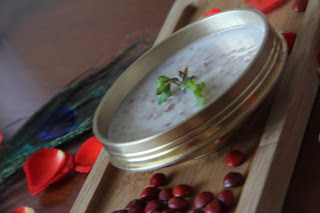
I prepared this as Naivedyam since palpayasam is a favorite prasadam for lord krishna and Naga devatas.


Ingredients 
Unakkalari  - 1 cup
Milk            -  3 Litre
Sugar          -   1 cup or 1 1/4  cup(Depending on your taste)
Kadali pazham (small plantain kerala) - 2 No,s
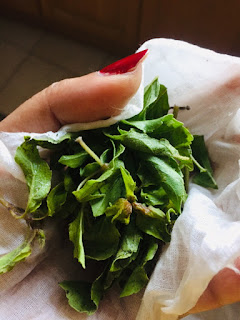
Tulsi leaves   - 1 Kizhi (bundle)

Preparation 

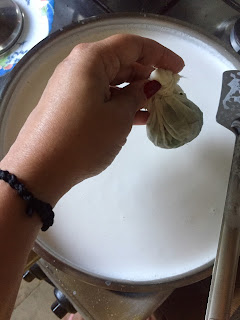
Thoroughly wash the rice, drain and keep it aside. In a heavy bottomed pan, (back in kerala we use brass uruli)  pour the milk and bring it to boil on a low flame. Add the rice in the boiling milk and let it cook on a low flame again, continuously stirring with a spatula, will take time more than one hour. we have to be patient. At this time take a handful of fresh tulsi leaves and place it in a small tidy cotton cloth and make a bundle in malayalam we call kizhi . and put the same in boiling payasam so that the essence and flavor of the leaves will get absorbed into the payasam giving a divine taste. once the rice is cooked well, sugar can be added. Never before because there is always a tendency to harden the rice if we add sugar before its cooked properly, Its time to remove the vessel from the stove when it gets a pale pink colour . and check the constituency as well,
Take two kadali pazham peel it and  cut in to small pieces and grind smoothly in a grinder along with a tablespoon of sugar. Add this paste in the payasam and stir well. This adds a unique taste to the palpayasam especially if we are  preparing it for Naivedyam. Remove the kizhi from the payasam after squeezing it.

Keralites will always have the tendency to compare  the taste with the tastee from prasadams we get from ambalapuzha and Guruvayoor  which is heavenly by all means.


Unakkalari 
If we strictly follow the customs and traditions, we are not supposed to prepare prasadam or neivedyam with white raw rice since its used exclusively for shradham related rituals. Madhu shared this traditional tip and I personally agree with it/. I also stopped using white rice and instead i am using unakkalari which i am bringing it from kerala. In UAE i dont think its available but as a substitute we can use Srilankan Red rice which is available in flour mills here. we will get almost the taste of unakkalari. Hope you will notice this tip next time when you prepare neivedyam.

                                                                  Unakkalari Picture
Also in the final stage we are adding kadalipazham smooth paste for a Unique taste
Kadali pazham is the real king in fruits with immense health benefits, No wonder why its being offered to our deities.


Friday, January 11, 2019

Idly ഇഡ്ഡലി

Ingredients:
Urad dal – ¾ cup
Idli rice – 2 cup Fenugreek / Uluva – ¾ teaspoon
Cooked rice – 3 tbsp
Curry leaves -- 2-3 leaves
water as required to make a thick batter


Preparation

Soak Urad dal , and idli rice separately for 4-5 hours. kindly use white rice if Idli rice is not available. but idly will turn out more soft if we use idly rice. Add fenugreek too while soaking urad dal.

Grind urad dal , fenugreek, and cooked rice adding sufficient water. Do not grind it smooth like dosa batter. ( Idly batter should be thick and dosa batter should be watery. ) Grind idly rice too adding sufficient water again not so smooth. Mix it well and add salt too Cover it with a lid and keep the batter away to be fermented, if we keep the batter overnight on a warm place it will get fermented by next morning. If you are abroad ,and in the AC, it may not work the same way. so kindly keep the batter inside the microwave to get the desired result.

Grease the idli thattu with ghee. Pour the batter with a laddle, In the idli cooker pour some water and bring to boil and transfer the thattu, cover it and steam it for 10 Minuits, once done remove the thattu and allow it to cool down before taking out idlis with a sharp knife or spoon, Serve soft idlis with sambar and chutney .

Monday, January 7, 2019

Mulaku Baji Chilly Baji (Kerala style ) മുളക് ബജി


Ingredients 

Baji Mulaku  7 no.s
Besan Flour   1 cup
Rice Flour  2 Tablespoon
Chilli powder 1 Teas[ppm
Turmeric powder 2 pinches
Baking soda 1 pinch (optional)
Hing A pinch
Ayamodakam Ajjwain  as required (optional)
Salt as required
Water  for making the batter - Batter should be thick not watery
Coconut Oil for deep frying

Preparation 

Make a thick batter using besan flour rice powder by adding required water. Add salt chilli powder turmeric powder baking soda and ayamodakam. Mix well. Keep the batter  for sometime to set. Wash the Mulaku ,, pat dry and with a sharp knife make a slit on one side and remove the seeds. keep it aside 
Heat the coconut oil in a kadai. Dip the Mulaku in the batter one by one, let it be well coated, and deep fry it. Fry till both the sides become golden brown color.  Have it hot with your favorite chutney. Also in the same batter you can make potato or cauliflower baji , chop the vegetables and dip in the batter and deep fry it, in the pictures you can find potato and cauliflower baji too along with mulaku baji. for that you can put  chopped corriander leaves too in the batter, for mulaku baji kindly avoid corriander leaves since its not found in traditional recipe.
Some of my friends have complaint that the besan flour makes their stomach upset. My suggestion is to put ajjwain and a pinch of hing asafoetida while making the batter, it will  help to reduce the digestive issues.
In kerala during monsoon, we make hot mulaku baji in the evenings and have it hot with garam chay sitting on the varandha . laid back enjoying the downpour.  Its indeed a nostalgic  thought  for malayalis around the world


Sunday, March 18, 2018

ALOE VERA (KATTAARVAZHA) HAIR OIL HOMEMADE


YET ANOTHER GRANDMA’S RECIPE FOR A HEALTHY SHINY THICK DARK HAIR. DIY at home.
Go back to nature whenever you get time and explore the gifts around. Aloe Vera is a wonder herb for skin and hair.
Aloe Vera ( kattarvazha) hair oil preparation at home.
I prepared this when I was in Kerala.


Take fresh Aloe Vera Leaves from the garden.
Cut into small pieces as shown in the pic.
Grind it in a mixer grinder, till you get a green liquid out of it. Strain it with a cotton cloth (extract it properly)and pour the gel In to an iron kadai. Mix the Aloe Vera liquid with the coconut oil .The ratio of aloe vera to the coconut oil should be 2:1 Heat the mixture on the stove on low flame occasionally stirring  the mixture well. Allow it to boil. Wait till you get a solid substance from the oil and Colour of the oil will turn  dark too. Switch it off and let it cool before storing it in a glass bottle.
Benefits:
It can prevent and treat dandruff, itchy scalp, make hair shiny and also promote hair growth.


Monday, February 19, 2018

Ottada

My Grandma's and amma's recipe with a fragrance of banana leaf is here for you all

She used to prepare ottada in the lazy evenings and will serve it with hot black tea. 
It is still fresh in my memory.


INGREDIENTS :

Rice flour -1 cup
Grated coconut -1 cup
Cumin/ jeera
salt

Fresh Plantain Leaves

Make a smooth dough of rice flour pouring boiled water into it. Add in salt and jeera too 

Using the fingers, Spread small rounds of batter on the leaf which is washed and wiped,
Dipping the finger once in a while in water, at the time of flattening the dough, will prevent sticking the dough in hand. I used to observe this tip whenever my amma used to make ada. Then using your fingertips, spread  the dough onto the leaf, flatten it as a thin layer.
Sprinkle grated coconut on this. (you  can add jaggery or sugar purely optional though )
Fold the leaf from one side and put the same on a hot clay tava and roast on both sides till small golden spots appear on both the surfaces.


Sunday, December 3, 2017

BANANA CHIPS


Its super easy still some of my friends had requested to post details, so I thought of putting it on my blog, kindly prepare it at home with LOVE at least during vishu and onam instead of buying it,
Strictly use pure coconut oil to get the authentic taste. Also take care to spread it on a newspaper after slicing, otherwise chances are there to get sticky. Two things have to be well taken care of;  Chips should be crispy and yellow in color.


Ingredients 

Nentrakkaya (Raw Kerala Banana )  2kg
Coconut Oil    for deep frying
Water
Salt to taste
Turmeric Powder  2-3 tsp


Method 

Take the plantains and make slits on the green skin vertically with a sharp knife , please make sure not to go too deep and cut the fruit.


After that with your hands, carefully remove the skin. 

(We can keep  the skin aside and prepare a tasty thoran out of it. its a healthy dish.)
In a large vessel take some water and sprinkle turmeric powder. 
Cleaned plantains keep it immersed in water for some time, wash it well and dry them with a clean cotton cloth,


Take the dry banana one by one and slice it thin and spread on newspaper carefully.


In a small bowl take some water to melt about 2 to 3 tsp of salt and mix well and keep aside.


Heat oil in a Kadai for deep frying, (we can keep a small bundle of turmeric powder as kizhi in the oil (its optional) to get the yellow colour)

Once the oil is hot,  slowly add the sliced banana in batches.keep stirring once in a while 

Once you think its crispy, we can make it out from the sound we get,  add salt water, keep stirring continuously.Drain it once the bubbles and sound have almost stopped. then spread it on a tissue paper, Allow it to cool before storing in airtight containers.


Tuesday, October 24, 2017

                                        POTATO POHA


Ingredients

potato 1 medium sized peeled n cubed
White poha/ Aval /Rice flakes 2cups
Oil
Mustard seeds 1 heaped tea spoon
Green chillies chopped 3
Jeera cumin seeds for seasoning
Red chilly for seasoning
peanuts (2 table spoon optional)
curry leaves a sprig
Turmeric powder 1/2 teaspoon
Lemon juice to taste
corriander leaves for seasoning finely chopped
water 1 cup


Preparation

Take poha in a big strainer vessel, wash and drain. keep it aside (I don't soak) 
Heat oil in a kadai. Add in peanuts and roast till golden brown.Add in mustard, jeera. After  spluttering add in curry leaves, green chilly, red chilly (hing optional) and mix well.
Add in  chopped potato along with water, salt and turmeric powder. Mix well.cover and keep it on a low  flame till potatoes are cooked . 
Once its cooked and not fully dried add in poha and toss  well.( carefully toss otherwise poha will get smashed)
Let it dry and finally garnish it with corrianer leaves and lemon juice


My daughter's favorite tiffin it''s. Aloo poha is a healthy tasty easy to prepare snack and it can be given as a tiffin to school going children and office going husbands :) 
I was in Gujarat when I was carrying my second child. Potato poha is a breakfast dish in Gujarat. I had a craving for this particular food during pregnancy. My husband's friend's wife Kavita used to send me this snack once in a week without fail. So kind of her to do it, i stil remember it with gratitude. That taste never matches with the one i make though.

These lovely plate wooden tray and cute wooden spoons are gift from my friend Jeeva. I just love them. so thought of using it while photographing it :)


Saturday, May 9, 2015

Special Cashew nut Payasam

This Cashew nut payasam ,which I first tasted  at our Alumni meet, was soooo delicious and fell in love with it instantly. So I definitely wanted to try this out and waited for a perfect occasion to come and finally made this on my son's birthday. It came out well. Am pretty much sure that this payasam which is thick and creamy in texture will soon be your  favorite too once tasted.

Special thanks to my friend Ajanta for her Recipe and timely guidance :) :)   


Ingredients :
  
Cashew nut                 250 Gm
Jaggery                       600 Gram or according to your taste.
Coconut                      scrapped 3
Ghee                           5- 6Tbsp
Cardamom powder
Cashew nuts and raisins roasted in ghee for decoration.
 
Preparation:

First Grind the cashews till fine and smooth and keep it aside. Melt the Jaggery adding sufficient water.Take out the extract from scrapped coconut. (Rich,creamy first milk should be kept aside for using in the final stage of the process)Then second, third milk also should be kept aside.
Pour ghee (4 Tbsp) in a pan and saute the ground cashews till brown on a low flame.Strain the jaggery syrup and add to it.  Mix well and cook at low heat. Add 2 tbsp ghee ,Stir continuously for about 10 – 15 minutes or until the jaggery is well-coated on the cashew paste. Now add the medium-thick coconut milk (second and third milk). Bring to a boil. keep it in a low flame n stir continuously for 30-40 mnts (This process will help to enhance the taste, texture n color of the payasam). Adjust the consistency according to your preference. Add the thick (first milk) coconut milk. Cook for a minute at low heat, Do not boil.Then switch it off.
Add the cardamom powder, Heat ghee (1-2 Tbsp) in a small pan and roast cashews and raisins and add that to prepared payasam.  Mix well. 
Delicious Kaju  payasam is ready to be served. Enjoy !!!! 


Wednesday, March 11, 2015

Kerala style Vellayappam

Ingredients :

 
 Raw rice  :2 cups
 Grated fresh coconut :1 1/2 cups

 Fresh  milk :1/2 cup (warm)
 Instant yeast  : 3/4 tsp  
 Sugar : 1 Tbsp
 Salt - to taste

 Cooked Rice :2 Tbsp
 Perum jeerakam (Fennel seeds) -1Tsp(optional)


Preparation : 

Soak raw rice for at least 3 hours. Put the drained rice along with sufficient water into the blender. While grinding, Take out 3 tbsp of coarse rice batter and pour it in a sauce pan along with a little water for kappi kachal process.Keep the pan on a stove and stir it continuously in low flame. Stir till it get thickens, and allow it to cool before adding to the rice batter. To the remaining batter add in grated coconut, cooked rice, sugar, and salt and grind to a smooth batter adding enough water.In the mean time, Mix  sugar and yeast  with fresh warm milk in a glass and keep aside for 10 minutes or until a froth appears on the surface well risen. Pour the same  into the prepared batter in a vessel, sprinkle fennel seeds (1or 2 crushed elaichi  can also be used for a particular aroma) too and  keep it for 3-4 hours or until the batter ferment and rise up.Once the batter is fermented, mix with a ladle and if the batter is very thick you can adjust with water.Place appa chatti over medium heat, and lightly grease it with a clean white cloth dipped in sesame oil. (this step will definitely bring in a different flavor to the appam)  Pour the batter with a ladle and immediately turn and tilt the pan in circle so that the batter spreads in perfect circle.Cover and let it cook for 2 min. Covering with a lid will help the center part to get cooked.


serve hot appams with curry :) 

With the same batter you can  make cute small appams too using unniappam chatti (Aappakkaara),
Kids will like it. During the process you will learn and reflect the meaning of patience too.