Wednesday, August 26, 2020

Poovada (പൂവട) Ela Ada

In Kerala, Poovada is prepared in vazhayila ( plantain Leaf) as Naivedyam for Onathappan on thiruvonam day. This is the first snack we get to taste on that day as prasadam. Along with the coconut  jaggery filling,  a thoughtful sprinkling of the  white "Thumba poovu" make the ada further more special and auspicious. I follow this.

Poovada can be prepared either by steaming it or by roasting it in an earthen vessel. It is interesting to note the flavor of filling mixture also changes with region. In some places, Riped bananas and rice flakes are also added while making this ada. Offer this poovada with utmost devotion to Thrikkakara appan and pray for the well being of all in this earth. Happy Onam.

Ingredients:

Roasted Rice Flour   1 cup

Ghee 1Tsp

Boiled water 1/1/2 or it varies depending on the rice flour you take.

Salt as required

For the filling:

Grated Coconut 1 cup

Jaggery Syrup or sharkkara pani  3/4 cup

Cardamom powder  1/4 Tsp

Plantain Leaf for making the ada

Preparation :

Melt Jaggery in a heavy bottomed vessel adding very little water. strain it to remove the impurities and again heat it to get the thick syrup. This can be stored in refrigerator and use it whenever in need.

In a hot pan pour 3/4 cup jaggery syrup. once its boiled add grated coconut. stir continuously. Switch off the stove when it get the right consistency. Not thick nor thin. Keep the mixture aside.

To a mixing bowl, Add rice flour, Ghee and salt. Pour boiled water and mix well with a spatula, cover it and let it rest for five minutes,  Now need the dough well to get a smooth texture,

Take the clean plantain leaf and place a lemon sized dough on the Centre  of the leaf. Flatten it using your fingertips to form a thin even layer. Dipping your finger tips in a bowl of water will ease the process (My mother used to do this). Take one tablespoon of filling and spread it on to one half of the flattened dough, Now fold the leaf in the middle and seal the edges by gently pressing it. Steam those adas in a steamer for 15- 20 minuets. Delicate melt in the mouth poovada is ready. Aroma and taste is unique since we prepared it in the leaf. 

Useful Tips: 

  • While making the dough, always knead nicely to get a soft smooth texture also add 1 Tsp ghee.
  • Dip your finger tips in water while spreading the dough on the leaf this will avoid sticking.
  • You can use variety of fillings as per your choice. Always you can replace sugar with jaggery too.
  • While pressing and evenly spreading the dough make it as thin and flattened  as possible to get an ela ada which is delicate and melts in the mouth 
video courtesy :Bubbly


Monday, August 24, 2020

Kerala Olan


Any Kerala traditional sadya (including onam sadya) is incomplete without this side dish OLAN. We might think it as dull and colorless. But Olan has got its own unique taste, look and significance. Its interesting to know the concept  behind this curry. Earlier in Traditional sadyas this olan was prepared out of Ash gourd only without adding even salt. The idea was to get a neutral taste in between while we switch over to various currys of sumptuous meal.  In olden days, Olan's role  was to act as a refresh button freeing our taste buds from the curry which we have tasted before and thus preparing to taste next item in the sadya. so that we could relish each curry with its authentic flavor. now the concept has been changed. we are counting this as a side dish. Recipes also differ  From place to place . There are versions with or without peas and in some places they use yellow pumpkin too.  In our home we are preparing olan with Ash Gourd and cowpeas.

Courtesy to my friend Madhu who as always patiently listens and shares more authentic information and interesting concepts behind our traditional treats for posting on the blog. So for me its a journey to explore, learn and find out more what we don't know even about our own traditional cuisines. 

Ingredients:

Ash Gourd  600 Gm.

Cowpeas (van payar) 1/4 cup

Green chillies sliced 3-4

Curry Leaves 1-2 twigs

Grated coconut for milk      3/4 coconut

Thick coconut milk (onnam pal ) 1/2 cup

Thin Coconut milk 1cup

Salt to taste

Rinse and Soak Peas (vanpayar) overnight and pressure cook adding sufficient water with one whistle. Keep it aside. (one whistle is enough since its soaked overnight otherwise it will take 3-4 whistles to cook)

Clean and chop ash gourd  into medium sized pieces. 

Extract thick coconut milk from the grated coconut adding 1/2 cup water. This is called onnam pal. keep it aside to add only on the final stage of cooking. Extract second round of thin cocunut milk adding 1 cup water. Cook ash gourd with this thin coconut milk in a manchatti or vessel. Add salt. Slit green chillies and curry leaves you can add after sometime to retain its fresh color. (open cooking is suggested)  Once ash gourd is translucent add cooked peas too. Mix well. Finally add thick coconut milk and mix well. Do not boil. Switch off the stove.

Useful Tips: Do not use left over water after the peas  are cooked. The curry will turn pinkish in color. 

No need to add coconut oil since we are using rich coconut milk for cooking

Green chilly and curry leaves if you add in the initial stage of cooking, it will lose its fresh color  and crispiness. so always add in the final stage.


Wednesday, August 19, 2020

Modak (Ganesh Chaturthi Special)


Modak is Lord Ganesha's favorite sweet and is prepared in Hindu homes during Ganesh Chaturthi festival as naivedyam/ prasadam for the Lord. In south India we call it kozhukottai. And in Maharashtra it's "Ukadiche". The word meaning is that which is steamed or steamed rice flour dough. Making modak  without molds teaches you to have much patience. It's Kadubu in kannada. The word modak means delightful. 


To make filling :

Grated Coconut     1cup

Jaggery Grated       1 cup (I used sharkkara paani (syrup concentrated so  i took 3/4 cup)

Cardamom powder 1/4 Tsp

To make dumpling :

Rice flour  1Cup

Water 2Cups (depending on the flour it may vary so use the proportion accordingly)

Ghee 1Tsp

Salt A pinch

Heat a kadai add grated coconut and jaggery. Keep stirring it. Mix well and cook on a low medium flame until the jaggery is fully melted and you will get a thick mixture. keep aside and Let it cool.

Meanwhile heat a heavy bottomed vessel or pan add ghee and water (salt if required) . let it boil. Now keep the flame on low. Gradually add rice flour to the boiling water. Mix well with a spatula. switch off the stove and cover the vessel for five mints. After sometime transfer the dough into a flat vessel or bowl and knead nicely into a smooth dough adding ghee if required. 

For shaping modak grease your both the hands with ghee. Take a lemon sized ball and flatten it with the help of your thumb and fingers and shape it to a cup (video attached). Fill the stuffing which is jaggery and coconuut mix. Make plates around the stuffing.Gather all plates around while making a twist. seal the edges thus using your hands and pinch the top. Heat up water in a streamer. when the water starts boiling keep the tray and keep modaks leaving enough space around each modak. cover with a lid. Steam it for 10 minuets . 

Modak is ready and there is no hard and fast rule since we are offering it as prasad with a pure heart. 


Sunday, August 16, 2020

Mulaku chuttaracha chammanthi ( Fried red chilly chutney)


In kerala, there is a traditional treat chuttaracha chammanti as a side dish for kanji, rice, idly or dosa. Tasty indeed as the ingredients coconut  ( small pieces) and red chilies are roasted in a burning charcoal . Now instead of traditional method we are using the stoves for cooking. So alternatively we can fry these ingredients in a hot kadai and can make the chutney. Here in this recipe i have roasted red chillies , shallots and curry leaves only. Tastes good.

Ingredients :

Coconut grated (Medium )   - 1/2

Red chillies       - 4 No.s

Curry Leaves  4-5 Leaves

Shallots small 2-3 No.s

Tamarind     - a small gooseberry size

Salt as required

Coconut oil  1-2 Tsp

Heat a kadai pour 1 Tsp Coconut oil and roast red chilies curry leaves and shallots until  it turn 

crisp. .Grind these with grated coconut,  tamarind and salt. Sprinkle one or two tsp water if needed. Grind it to a smooth or coarse paste as per your choice. Tasty chutney ready. 

 If you want to fry coconut , instead of taking grated coconut , you can cut coconut into small pieces removing the shell and fry along with other ingredients  and make chutney grinding it with all other ingredients mentioned above


Sunday, August 9, 2020

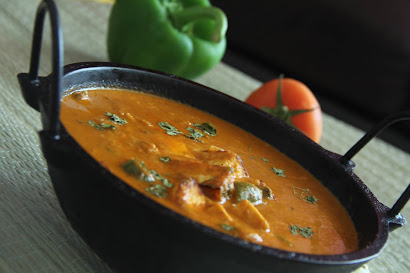
Kadai Paneer ( Restaurant Style)


Ingredients to make Fried onion and capsicum

Oil -   2Tsp
Onion cut into cubes  - 1no.
Capsicum cut into cubes -  1 No.

For frying Paneer

Butter as required
Paneer - 400 gms

To make masala powder

Coriander seeds -   1Tbsp
Pepper  - 1/2 Tsp
Cinnamon  - 1 inch piece
Bay leaf  -  2 No.s
Cumin seeds  - 1Tsp
Clove - 4No.s
Red Chilly dried - 4 No.s

To Make Onion and Tomato Paste

Oil - 1/1/2 Tbsp
Garlic - 5 cloves
Ginger - 1 inch piece
Onion ( Thinly sliced) -2 No.s 
Tomato ( Chopped - 3 no.s ) 

Other Ingredients for the final round

Oil - 1/1/2 Tbsp
Butter - Tbsp
Ground Onion Tomato paste
Ground Masala powder - 1/1/2 Tbsp
Kashmiri Chilli Powder - 1 Tsp
Salt as required
Water - 1 1/2cups
Frsh cream - 1 Tbsp
Kasuri Methi

Prparation step by step : 

1) Heat a Pan Add oil Onion and capsicum. Saute it well till onion becomes transparent and keep it aside.

2) Heat Butter  in a pan for frying the paneer.  Fry the cubed paneer pieces. shallow frying. Take them out once they turn golden brown. keep them aside.

3) For making masala powder, keep a pan on the stove on medium flame. Add the above mentioned ingredients  and roast for 2-3 minuets till we get the nice roasted aroma of the spices. Allow it to cool and grind them as fine powder.

4) For making the paste : In a Kadai, Add oil,  ginger, garlic, Chopped onion , tomatoes, salt and sauté them well on a medium flame. after 5-8 minutes  switch off the stove and let it cool and grind it into a fine paste using mixer grinder.

Kadai Paneer Preparation: 

Heat oil in a kadai add oil and butter, Then add the ground masala paste and add required water in the jar in order to get the mixture which is still sticking on it . After the masala gravy thickens evaporating the excess water,  add salt chilli powder and the ground masala powder. Mix everything together. 
Once the gravy thickens and starts oil is separating is the good time to add fried onion and capsicum wedges. Now add  1/ 1/2 cups of water and keep the flame on medium. Close and cook the gravy for 7 minuets. After the oil separates add fried paneer. After a minuet add fresh cream and  some crushed kasuri methi. Gently mix everything and turn off the stove.
Serve hot with main dishes of your choice.

Courtesy : This wonderful recipe is taken from Home Cooking Show channel


Saturday, August 1, 2020

Vegetable Fried Rice

Ingredients : 

Basmati Rice   1 Cup
Spring Onion (Chopped)  1 Bundle (3- 4 bulbs)
Carrot (Chopped) 1 No. Medium
Beans (Chopped)  1/4 Cup
Capsicum (Chopped) 1 No. Small
Green chilly sliced 2 No.s
Garlic finely chopped 1 Tbsp
Soya Sauce 2 Tsp
Chilly Sauce 2Tsp
Pepper powder 1/2 Tsp
Water  1 Cup
Salt as required
Oil As required

Preparation :
Soak the rice for half an hour. drain it and keep aside.
In a hard bottomed pan heat oil. Saute Finely chopped garlic first. Add chopped spring onion bulb. Sauté it for 2-3 minutes and add vegetables, capsicum, green chilly and spring onion green part. Mix and saute well. (If you want to prepare non veg fried rice, you can add scrambled egg or shredded chicken cooked with pepper and salt at this stage) Add Rice, salt, pepper powder and spring onion green portion chopped. Saute it and finally add soya and chilly sauce. Mix well and add water. Cover the vessel with a lid. Let it boil and simmer the flame for five minutes and switch it off and keep it on the stove without opening the vessel. After half an hour open the lid , garnish it with chopped spring onion and serve hot with side dish of your choice. here we are taking 1:1 ratio for the rice and water while cooking. In this way rice will be aptly cooked and will remain without sticking each other.